Preliminary
Start mysql
docker run -d -p 3306:3306 --name jboss-mysql -e MYSQL_ROOT_PASSWORD=admin mysql:latest
CREATE DATABASE kieWb;
CREATE USER 'jboss'@'%' IDENTIFIED BY 'jboss';
GRANT ALL ON *.* TO 'jboss'@'%';
flush privileges;
SHOW GRANTS FOR 'jboss'@'%';
Download the Driver
Download latest MySQL driver from here
Install MySQL Module
Jboss-cli
module add --name=com.mysql.driver8 --dependencies=javax.api,javax.transaction.api --resources=E:\bundles\mysql-connector-java-8.0.25.jar
following content created automatically in wildfly-19.1.0.Final\modules\com\mysql\driver8\main
module.xml
<?xml version='1.0' encoding='UTF-8'?>

<module xmlns="urn:jboss:module:1.1" name="com.mysql.driver8">

    <resources>
        <resource-root path="mysql-connector-java-8.0.25.jar"/>
    </resources>

    <dependencies>
        <module name="javax.api"/>
        <module name="javax.transaction.api"/>
    </dependencies>
</module>
start/restart our Wildfly server so that our MySQL module is picked up and available
Note: you can even use the following command
deploy E:\bundles\mysql-connector-java-8.0.25.jar
To check if driver installation was successful
/subsystem=datasources:installed-drivers-list
To list the current datasources present in Wildfly, run the following command:
Manually
You would have to create the similar structure and files as created by jboss-cli
Management Console
You can install it as separate deployment
Install MySQL Jdbc Driver
Jboss-cli
/subsystem=datasources/jdbc-driver=mysql/:add(driver-module-name=com.mysql.driver8,driver-name=mysql,driver-class-name=com.mysql.jdbc.Driver)
Driver added, as can be seen in management console
highlighted section automatically added to wildfly-19.1.0.Final\standalone\configuration\standalone.xml
Manually
You would have to create the similar structure and files as created by jboss-cli
Management Console
Install DataSource
Jboss-cli
Finally, install the data source by using the data-source shortcut command, which requires as input the Pool name, the JNDI bindings, the JDBC Connection parameters and finally the security settings
data-source add --jndi-name=java:/MySqlDS --name=MySqlPool --connection-url=jdbc:mysql://localhost:3306/kieWb --driver-name=mysql --user-name=jboss --password=jboss
Note: Preferred jndi-name pattern would be java:jboss/datasources/MySqlDS instead of java:/MySqlDS
To remove
data-source remove --name=MySqlPool
Manually
You would have to create the similar structure and files as created by jboss-cli
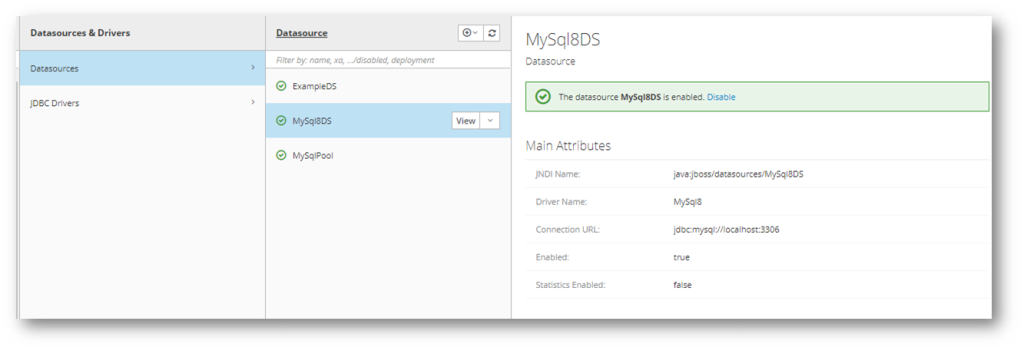
Management Console
Testing
You can check that the datasource has been installed correctly .
Jboss-cli
/subsystem=datasources:installed-drivers-list
/subsystem=datasources/data-source=MySqlPool:test-connection-in-pool
Management Console
Install in Domain mode
Above we have installed in standalone mode, we can do it in domain mode as well.
Associate the Datasource with the Domain Profile, Module installation should be done in every Host Controller
module add --name=com.mysql.driver8 --dependencies=javax.api,javax.transaction.api --resources=E:\bundles\mysql-connector-java-8.0.25.jar
install the JDBC driver on a server Profile
/profile=full-ha/subsystem=datasources/jdbc-driver=mysql:add(driver-name=mysql,driver-module-name=com.mysql.driver8,driver-class-name=com.mysql.jdbc.Driver)
installing the data source requires the –profile additional option:
data-source add --jndi-name=java:jboss/datasources/MySqlDS --name=MySQLPool --connection -url=jdbc:mysql://localhost:3306 --driver-name=mysql --user-name=jboss --password=jboss --profile=full-ha
Creating XA Datasource
module add --name=com.mysql.driver8 --resources=E:\bundles\mysql-connector-java-8.0.25.jar --dependencies=javax.api,javax.transaction.api
/subsystem=datasources/jdbc-driver=mysql/:add(driver-module-name=com.mysql.driver8,driver-name=mysql,driver-class-name=com.mysql.jdbc.Driver)
xa-data-source add --name=MySqlDSXA --jndi-name=java:jboss/datasources/MySqlDSXA --driver-name=mysql --xa-datasource-class=com.mysql.jdbc.jdbc2.optional.MysqlXADataSource --user-name=jboss --password=jboss --xa-datasource-properties=[{ServerName=localhost}]
You can add additional properties as follows
/subsystem=datasources/xa-data-source=MySqlDSXA/xa-datasource-properties=DatabaseName:add(value="mysqlschema")
Shutdown The Instance
jboss-cli.bat --connect command:shutdown
References


